Define verification requirements
Before implementing ZKML, you must determine exactly what needs to be verified. ZKML combines zero-knowledge proofs with machine learning to verify model outputs without exposing private data or proprietary weights. This capability is essential when you need to prove a model was trained on specific data or executed correctly, all while keeping the underlying parameters secret.
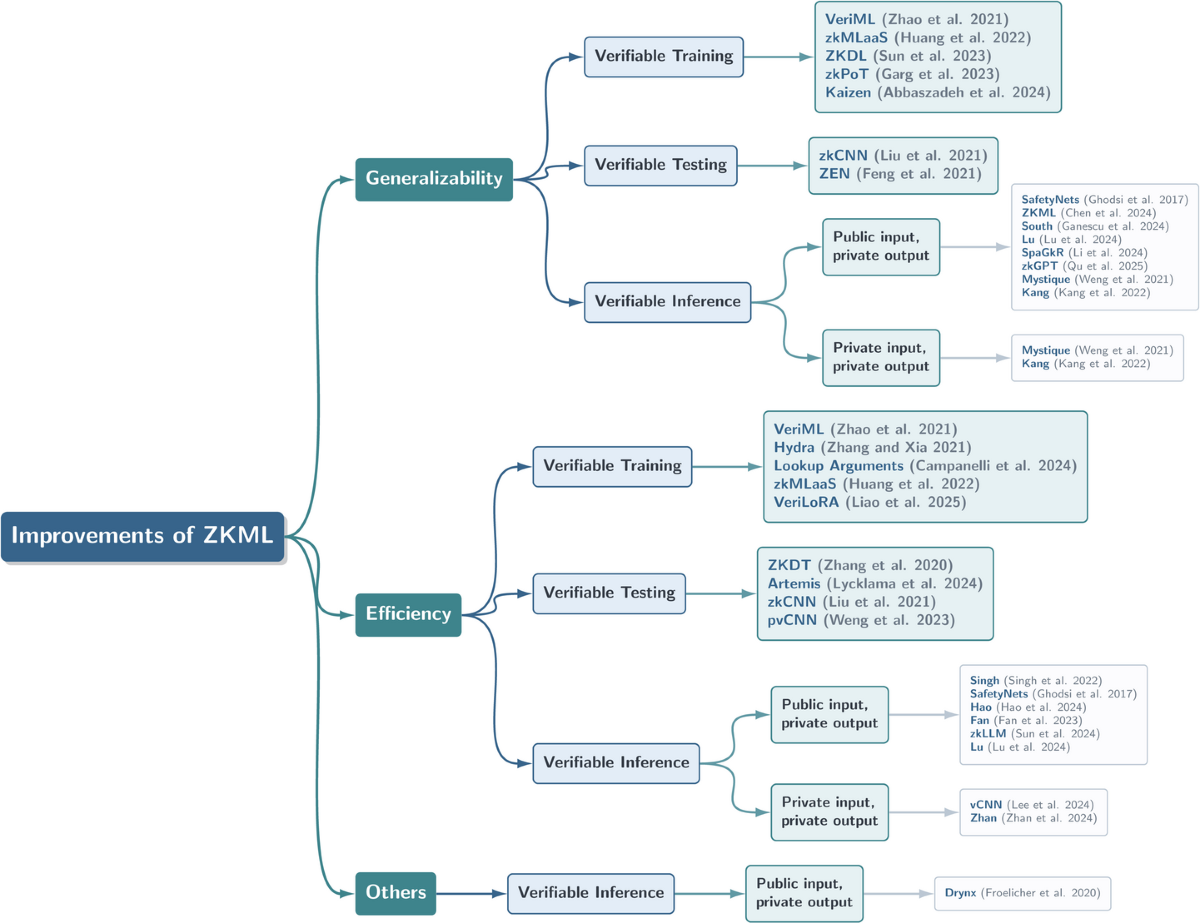
Start by identifying your primary constraint: privacy or integrity. If your goal is to protect proprietary model weights, you need a framework that can generate zero-knowledge proofs for the inference process itself. Systems like ZKML, as demonstrated by Chen et al., can produce ZK-SNARKs for realistic models, including vision models and large language models like distilled GPT-2 [[src-serp-3]]. This proves the computation happened without revealing the model architecture or weights.
Alternatively, if the concern is data privacy, you may need to verify that the model was trained on a specific dataset without exposing that data. This requires a different proof structure, often involving commitments to the training data. Clarifying this distinction early prevents architectural missteps later in the development cycle.
Finally, assess the computational cost. Generating zero-knowledge proofs for ML models is resource-intensive. Define the acceptable latency for proof generation and verification. If real-time inference is required, you may need to optimize the proof system or limit the model complexity. Balancing security guarantees with performance is the core challenge of ZKML implementation.
Select a prover framework
Choosing a prover framework determines whether your ZKML verification is feasible on a single machine or requires a distributed cluster. The choice hinges on three constraints: proof size, generation time, and the specific ML operations your model uses.
If you are verifying small, static models like logistic regression or tiny neural networks, Circom is the standard entry point. It offers a mature ecosystem and extensive documentation for building arithmetic circuits. However, Circom’s performance degrades significantly as circuit complexity grows, making it unsuitable for large vision or language models in 2026.
For larger models, you need a framework that supports parallel proof generation. Halo2 and Plonky2 (or its successor Plonky3) are designed for this. They use polynomial commitments that allow the proof generation process to be split across multiple machines. This is critical for 2026, where proof generation is shifting from a single beefy server to a parallelized cluster.
| Framework | Proof Size | Generation Speed | Best For |
|---|---|---|---|
| Circom | Large | Slow | Small, static circuits |
| Halo2 | Medium | Moderate | Balanced security/perf |
| Plonky2/3 | Small | Fast | Large, parallelizable models |
Start by benchmarking your model’s circuit size. If the number of constraints exceeds 100,000, avoid Circom. Opt for a polynomial-based framework that supports recursive proof composition. This allows you to generate proofs for individual model layers and then combine them, keeping proof sizes manageable.
Translate model to circuits
To verify an AI model with zero-knowledge proofs, you must first convert its mathematical operations into arithmetic circuits. This process transforms floating-point matrix multiplications and activation functions into a set of constraints that a prover can satisfy. Without this translation, the neural network remains a black box that cannot be proven on-chain.
The conversion pipeline typically follows three distinct phases: quantization, gate decomposition, and constraint generation.
1. Quantize and Linearize
Neural networks rely heavily on floating-point arithmetic, which is computationally expensive and complex for zk-SNARKs. The first step is to quantize the model weights and activations, reducing precision from 32-bit floats to 8-bit integers or lower. This reduces the circuit size significantly.
Next, non-linear activation functions like ReLU or Sigmoid must be linearized or approximated using low-degree polynomials. These approximations allow the operations to be expressed as simple arithmetic constraints rather than complex conditional logic. Frameworks like ZKML automate this phase, optimizing the model for efficient proof generation.
2. Decompose into Arithmetic Gates
Once quantized, the model is decomposed into basic arithmetic gates: addition, multiplication, and field inversion. Every layer of the neural network—whether convolutional or fully connected—is mapped to a sequence of these gates.
For example, a matrix multiplication becomes a series of dot products, each represented as a chain of multiplications and additions. This decomposition creates a large but structured circuit graph. The goal is to minimize the number of multiplication gates, as they are the most costly component in terms of proof time and verification cost.
3. generate and export limits to account for
The final step is to export the circuit into a format compatible with your chosen prover, such as R1CS (Rank-1 Constraint System) or PLONK. This involves generating the witness data and the constraint matrix.
The resulting circuit file is then used by the prover to generate a proof that the output matches the input given the public weights. This proof can be verified on-chain, ensuring the AI inference was performed correctly without revealing the underlying data or model weights.

Reduce floating-point weights to integers and approximate non-linear activations to lower the circuit complexity.
Map matrix operations to basic arithmetic gates (add/mul) to create a structured constraint graph.
Generate the final constraint system and witness data for the chosen zero-knowledge prover.
Generate and verify proofs
Proof generation is the computational core of zkML. You must translate your AI model into a circuit that a prover can execute, then verify the output on-chain or off-chain. This process is resource-intensive, but understanding the workflow helps you plan for the costs and infrastructure required.
1. Prepare the AI model for zero-knowledge circuits
Before generating any proofs, you need to convert your machine learning model into a format compatible with zero-knowledge proof systems. This involves translating the model’s layers—such as matrix multiplications and activation functions—into arithmetic constraints. Popular frameworks for this include Circuits for general arithmetic or specialized libraries like TensorFlow-ZK for deep learning.
The complexity of your model directly impacts the size of the circuit. Simple linear regression models generate small circuits, while large language models (LLMs) or convolutional neural networks (CNNs) require massive constraint systems. Start by optimizing your model for sparsity and quantization to reduce the number of constraints.
2. Choose a prover framework
Select a prover framework that balances speed, cost, and compatibility. The two main categories are interactive and non-interactive proofs. For most zkML applications, non-interactive proofs (SNARKs or STARKs) are preferred because they allow for efficient batch verification.
Popular options include:
- SnarkJS: A JavaScript-based prover, good for testing and small models.
- Groth16: Offers small proof sizes and fast verification, but requires a trusted setup.
- Plonky2: A newer framework designed for high-throughput proving, often used in rollups.
Ensure your chosen framework supports the specific arithmetic operations used in your AI model. Some frameworks struggle with non-linear operations, which are common in neural networks.
3. Execute proof generation
Proof generation is the most computationally expensive step. You will run your model through the prover framework to generate a cryptographic proof that the output was computed correctly. This can take anywhere from minutes to hours, depending on the model size and the hardware used.
For production environments, consider using specialized proving services or hardware accelerators like GPUs or FPGAs to speed up the process. The cost of this computation is significant. According to benchmark analysis, zkML proof generation projects typically range from $40,000 to $250,000 USD depending on model complexity, prover framework, and audit depth.
4. Verify the proof on-chain or off-chain
Once you have the proof, you need to verify it to ensure the AI model’s output is valid. Verification can be done on-chain (within a smart contract) or off-chain (in a separate verifier service).
- On-chain verification: Ideal for decentralized applications where trustlessness is paramount. However, on-chain verification is expensive in terms of gas fees, especially for large proofs. Use this for high-value transactions or critical decision-making.
- Off-chain verification: More cost-effective and faster. Suitable for applications where you trust the verifier node or where the consequences of a false positive are low. This is common in data analytics or internal business processes.
5. Handle verification failures
If the verification fails, it means the AI model’s output was not computed correctly according to the circuit constraints. This could be due to a bug in the circuit, a mismatch in the model weights, or an error in the input data.
Debugging zkML circuits is challenging because the error messages are often abstract. Use simulation tools to test your circuit with known inputs and outputs before generating full proofs. Keep a record of your model versions and circuit configurations to trace back any issues.
Optimize proof generation costs
Running a single, beefy machine to generate zkML proofs is becoming a bottleneck. As 2026 benchmarks show, the most effective way to reduce costs is shifting from serial processing to parallelized proof generation across a distributed cluster. This approach splits the circuit workload, allowing you to handle larger models without exponential cost spikes.
Start by partitioning your ZKML circuit into independent segments. Modern prover frameworks now support splitting the proof generation task, meaning you can distribute these segments across multiple nodes simultaneously. Instead of one machine running for days, you deploy several instances that work in parallel. This parallelization directly reduces the time-to-proof and lowers the computational overhead per unit of work.
Hardware acceleration remains critical for the remaining serial portions of the proof. Use GPUs or specialized ASICs for the heavy matrix multiplications required by the ML model inference. Combining cluster parallelization for the circuit logic with hardware acceleration for the mathematical heavy lifting creates the most cost-efficient pipeline. This hybrid strategy aligns with the 2026 standard for scalable on-chain AI verification.
-
Partition the ZKML circuit into parallelizable segments
-
Distribute segments across a multi-node prover cluster
-
Offload matrix multiplications to GPU or ASIC hardware
-
Benchmark parallel efficiency against serial baseline
Common ZKML implementation errors
Circuit design for machine learning models introduces unique constraints that traditional zero-knowledge proofs do not face. The gap between abstract model accuracy and verifiable circuit efficiency is where most projects fail. Understanding these pitfalls prevents wasted engineering cycles and ensures your ZKML system remains performant.
Inefficient Non-Linear Gate Usage
Neural networks rely heavily on non-linear activation functions like ReLU or Sigmoid. Implementing these in zero-knowledge circuits requires complex arithmetic, which drastically increases proof generation time. Instead of coding raw mathematical operations, use optimized libraries that pre-compute these gates. This approach reduces the constraint count significantly, keeping inference feasible on-chain.
Ignoring Numerical Precision Loss
ML models often operate on floating-point numbers, but zk-SNARKs work exclusively with finite fields. Converting floating-point operations to fixed-point arithmetic without proper scaling leads to accumulated errors. These errors can invalidate the proof or produce incorrect inference results. Always validate the precision bounds of your circuit against the original model’s tolerance levels before deployment.
Overlooking Memory Access Patterns
Standard ML inference is memory-intensive, accessing weights and biases repeatedly. In ZKML, every memory access adds a constraint. Failing to optimize memory layout or cache usage can make verification prohibitively expensive. Structure your data access patterns to minimize redundant reads, ensuring the circuit remains lightweight.
Verify AI model integrity
The final step in the zkML workflow is validating the cryptographic proof. This ensures the AI model’s output matches the committed weights and architecture without re-running the computation. You must verify the proof on-chain or within a secure enclave to establish trust.
On-chain verification
Deploy the verification key to your target blockchain. Use the native verifier contract to check the proof’s validity. This step confirms the model executed correctly according to the zkML framework specifications.
Secure enclave verification
For off-chain applications, verify the proof within a trusted execution environment (TEE). This approach is common when integrating AI models into private data pipelines. It ensures the model’s integrity without exposing sensitive data to the public chain.
Cost considerations
Proof generation costs vary significantly. According to 2026 benchmarks, projects typically range from $40,000 to $250,000 depending on model complexity and the prover framework used. Plan your budget accordingly to avoid unexpected expenses during the verification phase.
No comments yet. Be the first to share your thoughts!